Whether you’re a budding livestreamer and vlogger or just want to record better quality videos of your holidays and special life events, our tips can help.
When faced with the slickly produced videos and livestreams uploaded by powerhouse influencers, from the d’Amelios to Zoella, it’s easy to think that high-quality videos are beyond your reach. Yet, with our tips and guidelines to hand, you too can up your smartphone videography game.
Our videoing rules of thumb are divided into two broad categories, those that apply to all scenarios. And those that are specifically relevant when you’re recording yourself while speaking to camera, sometimes known as video selfies.
General guidelines
Lighting
Even more so than with photography, lighting is crucial when filming as your smartphone’s imaging sensor and lenses will often struggle with shadows and dark scenes. Whenever possible, try to film where there’s as much light as possible. This will make for the best possible looking footage. Close-up shots of yourself and other faces require their own set of considerations, which is covered below in the Video Selfies section.
In places where the amount of light and its brightness varies, such as in pubs and clubs with dank nooks or in parks with shady trees, many smartphone cameras will attempt to compensate. But in doing so, they can introduce sudden shifts in both brightness and the appearance of colours which can be jarring for your viewers. Recording where the light is even and consistent can help avoid this.
Movement
Filming movement can be hard, with fast moving subjects quickly speeding out of shot or your video looking juddery as you struggle to keep up with fast moving subjects.
This short video of a cat isn’t very interesting…
…but by tracking its face and movements, it becomes much more engaging – from its attempts to head butt the cameraperson’s hand to the now audible sound of its purring which had previously been out of range of the phone’s microphone
When filming people and pets, especially overexcitable children and animals, try to keep their faces in focus – as this tends to be of the most importance – while also moving your phone to match their speed. Their facial expressions will bring focus and emotion to your footage, while the movement will convey a sense of excitement. If you can, get close to your subject to avoid them becoming a blurry dot surrounded by vast expanses of background.
Stabilisation
Unwanted camera shake and judderiness can seem unavoidable, but it can be minimised with a little bit of planning. The cheapest and easiest way is simply to lean against something, such as a wall, tree or post. Another obvious but often forgotten technique is to hold your phone with both hands while filming; tucking in your elbows close to your body can also help.
Most smartphones made in the past couple of years will have optical stabilisation on their lenses, and sometimes their imaging sensors, to help counteract most judderiness caused by your hand movements. They can only do so much though. If you regularly film fast-moving scenarios, consider buying a gimbal such as a DJI Osmo. These dedicated handheld stabilisers can help your phone produce exceptionally stable and smooth action shots.
If you don’t need to move around while shooting, a tripod can be a cheaper alternative to a gimbal. Tripods small enough to tuck away in a coat pocket or bag, with flexible legs for hanging off railings and other fixtures, are available.
Audio and noise
Smartphone microphones are very good at picking up noise from all around you. This makes them adept at recording, for example, hubbub and other ambient noises when you’re filming crowds of people or a landscape.
That’s less than ideal for when you’re recording a person or when you’re trying to home in on a particular sound. The intrusive shearing sound of wind when recording outside, for example, is a common bugbear. Moving your phone physically closer to your subject, whenever possible, can help.
An alternative is to use an external mic, which needn’t involve splashing out large sums of extra money. If you have Bluetooth earphones or headphones with a built-in mic, such as AirPods or Galaxy Buds, you should be able to use it to record your video’s sound in place of your smartphone’s mic.
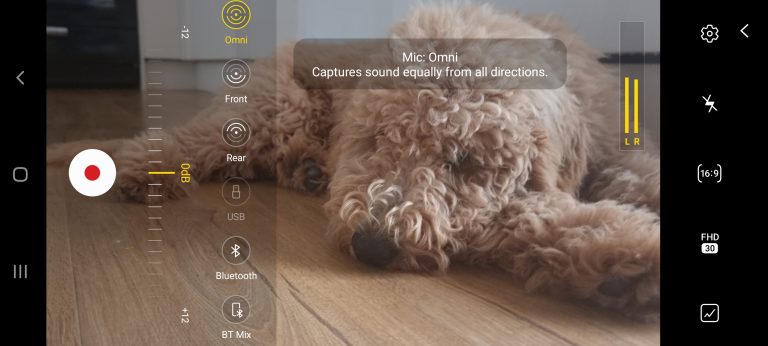
On some Samsung smartphones, such as the Galaxy S10 and later, you can switch between your smartphone mic and a Bluetooth mic in the Samsung Camera app’s Pro Video mode. On some other handsets, such as iPhones and some Huawei phones, you’ll have to use a third-party camera app, such as FiLMiC Pro or Movie Pro, to do this.
Portrait video
Unless you’re 100% certain your video will never be seen outside of TikTok, Snapchat or Instagram, film in landscape rather than portrait orientation. Viewers will get a much roomier view of your subject on laptops and TVs as a result, as well as on the latest phones with strappingly huge widescreen displays.
Do Not Disturb!
Although not directly related to videoing, there are a couple of practical steps you should take for a smooth filming experience. First, clean your smartphone’s camera lens. Second, switch on your phone’s Do Not Disturb mode – especially if you’re filming for a lengthy period – to ensure you’re not distracted by notifications. These may sound obvious, but they’re commonly overlooked and can spoil your filming.
Video selfies
Lighting
With the light source behind the subject, who is already under shade, the face is harder to see clearly
Although much brighter, the overhead light is now causing the subject to squint which lessens any potential emotional connection
Lighting yourself, and indeed other people, needs a little extra forethought to get the best possible results. Light should ideally shine onto the side of faces, rather than straight onto them or with the light source directly overhead as this can cause people to squint. As squinting obscures people’s eyes, it lessens the emotional impact of your video on your viewer.
Eye level
Unless you’re aiming for a Blair Witch Project-style look, it’s generally best to have your phone’s camera at eye-level rather than looking down or looking up at you. Not only does this help avoid unwanted up-the-nose and down-your-shirt shots, it also helps ensure that you’re looking directly at your viewers to form a stronger connection.
Background
It’s generally best to have a plain, simple background while you’re recording yourself, such as a wall or other single colour backdrop, to avoid unduly distracting your viewers. This largely applies even when you want to refer to something else in the background, such as a landscape feature or a crowd, as you can always pan your phone’s camera as needed.
Background noise can be just as intrusive as background visuals. Even if you’re using a Bluetooth mic to record your voice, you’re still more likely to get better sounding results if you can find a reasonably quiet area to film.
Which camera?
Although the difference is narrowing on some of the very latest handsets, your phone’s rear-facing camera is still more likely to take higher quality video than its front-facing selfie camera. Although it can be harder to see what you’re filming, use your rear-facing camera to film whenever possible.
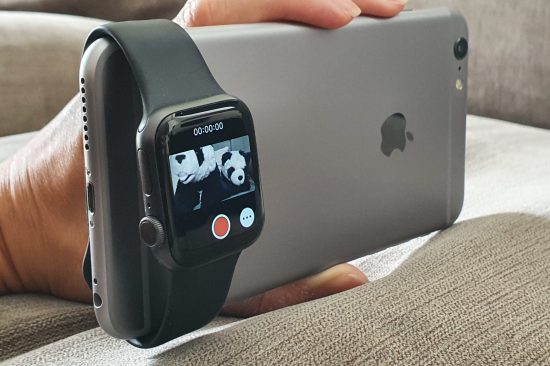
If you don’t have an extra pair of hands to act as a cameraperson, all hope is not lost. Some camera apps will have a timer function, so you have time to set up your shot and get in position before recording starts. Also, some smartwatches – such as the Apple Watch – can act as a remote display for your phone’s camera so you can always see what it sees.
Multiple takes and editing
Finally, unless you’re livestreaming, it never hurts to have multiple takes, each broken down further into short clips rather than just a few long recordings. You can then edit together the best bits from each attempt. To makes this easier on yourself, leave an 8-10 second gap at the beginning and end of each take – this makes it much easier to snip and stitch together your final video without worrying about mismatched sound from fluffed lines.
Stay up-to-date with the very latest news from Vodafone by following us on Twitter and signing up for News Centre website notifications.
