
In this beginner's guide, we give you practical tips on how to snap envy-inducing photos no matter which phone you own.
The latest flagship smartphones are pushing the boundaries of mobile photography ever further. But knowing a few practical “how to” fundamentals can help you wield that new phone to the best possible effect, and help you achieve higher quality photos even with an older phone, too.
1. Light, camera, action!
Lighting is critical to photography, no matter what you’re shooting. The right lighting can not only flatter your subjects, but also add atmosphere and drama, too.
If the weather and your schedule permit it, the most striking landscape shots are taken in the afternoon/early evening during the hour or so immediately preceding sunset. This “golden hour” is named after the amber-hued light which can lend a dramatically moody quality, not just to landscape shots, but to portraits as well. If you’re an early riser, the hour or two immediately following sunrise can give a similar golden effect to your shots.

The early morning light helps emphasise the soft, glossy coat of this playful little cat.
You don’t always need to hang around for golden hour though. When photographing portraits of people, it’s best to avoid harsh overhead lighting such as the fluorescent strips found in offices, community halls and train stations. It’s best to have the light source behind you – the photographer – whenever possible rather than behind the person you’re shooting. This almost always results in a clearer and more flattering portrait.

This dashing fellow was photographed with the sun behind him…

…and again with the sun behind the smartphone photographer. This second shot is more clearly and evenly lit.
2. Adjust your exposure
Smartphone photos can sometimes appear too dark or too bright. You can help compensate for this by manually setting the exposure, which – to put it very simply – tells the camera how much light it should be recording. By default, your smartphone’s camera will automatically set its exposure value, but you can override this.
The way for this exposure compensation varies from phone to phone. Within the Camera app on iPhones, double tap the screen and hold on the second tap – a small slider control with a sun icon will appear. You can then slide this control up to increase the amount of light the camera will record. Or you can slide the control down to decrease the amount of light recorded.
The location of exposure compensation controls on Android phones can vary. While some have the same arrangement as iPhones, on some Huawei phones, for example, to get to the exposure compensation control you have to tap on the More drawer in the Camera app and then tap on the Pro button.
3. Focus, focus, focus
Your smartphone’s camera will automatically choose what to focus on in any given scene, such as faces. It doesn’t always get this right though, or you may want to set the focus on something else such as the facade of a building rather than the people and traffic travelling past it. To change the focus, simply tap your finger on another part of the screen.
You can also lock the focus, so that the camera doesn’t automatically shift it back again, which is useful in many situations, such as shooting variations of the same scene. On most phones, you can lock the focus in the Camera app by pressing and holding on a part of the screen. When the lock is active, a small autofocus lock badge will appear on screen. To turn off focus lock, simply tap on another part of the screen.

The appearance of the autofocus lock control can vary from phone to phone.
4. Composition: The basics
Think about what to include and exclude in your shot, especially if you’re photographing something large and complex such as a building, landmark or monument. London’s Paddington Station, for example, is full of potentially snapworthy moments and scenes. This photo of one of the station’s smaller platforms follows a few basic rules of composition.
The image, bisected by a large metal strut in the middle, is broadly symmetrical – the two halves of the image largely mirror each other in size and general content. There are ‘leading lines’ – the swooping curved lines of the platforms and awnings grab your attention, drawing your eye off into the horizon towards the departing passengers and the trains. And, despite its apparent complexity, the subject matter is simple – a set of arriving and departing trains.
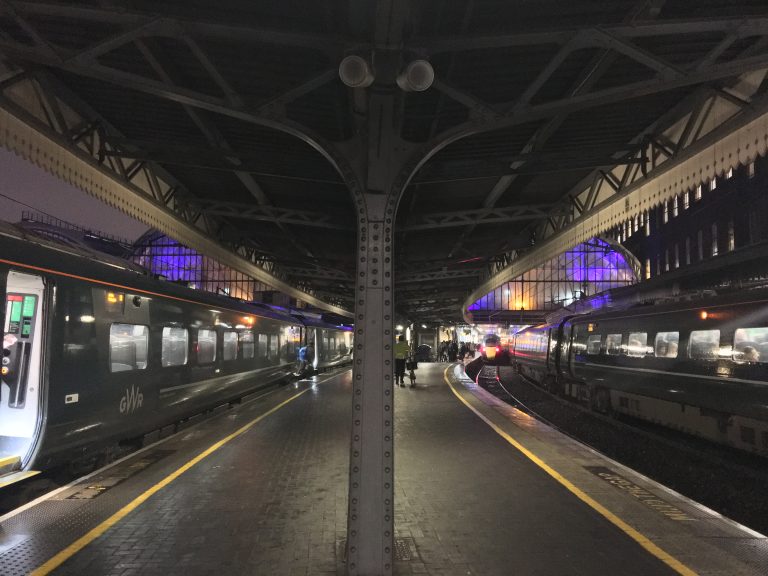
Applying a few simple rules of composition to your photography can lead to subtle yet nonetheless noticeable improvements.
5. Composition: Point of view
This may seem obvious, but changing how you hold your phone while taking photos – depending on the subject – can markedly improve your shots. For example, shooting this Christmas tree horizontally seems only natural as it’s part of a landscape. But the finer details of the tree are muddled and lost in favour of a landscape that frankly isn’t that interesting. The tree is the subject of this photo and, as it’s vertically oriented, it therefore makes sense to shoot it while holding your phone in portrait orientation. The result is a far simpler and more pleasing photo with details that are far easier to pick out, from the large baubles and rings to the individual lights.

It may sound silly, but switching the shooting orientation of this Christmas tree from landscape…

…to portrait results in immediate improvements.
Conversely, in other situations, it’ll make more sense to shoot horizontally rather than vertically. Take your cue from your subject – its shape and size will guide you to whichever orientation will show it off to the greatest possible effect. If in doubt, shoot it both ways and learn from experience.
6. Composition: You’ve been framed
Where you place your phone while shooting and how you frame your photos, or where the subject in your shot is in relation to other elements, can make a world of difference.
A good example is when photographing pets and children. As they’re often physically smaller than you are, it’s natural to shoot them while standing above them. While the resulting shot emphasises how small they are in relation to you, it makes for a largely uninteresting and lifeless photo.
It’s far better, subject permitting, to crouch down to their eye level and let their expressive faces fill as much of the shot as possible. The results can be far more emotive and therefore engaging.

Changing the angle and composition of your shot…

…can lead to a far more engaging photo.
An inventive and experimental approach to framing can jazz up otherwise ordinary shots. For example, this autumnal garden scene looks exceedingly mundane at first glance. But by nestling the phone in a bush and using its branches to frame the shot, the resulting photo looks far more eye-catching with a touch of mystery to it.
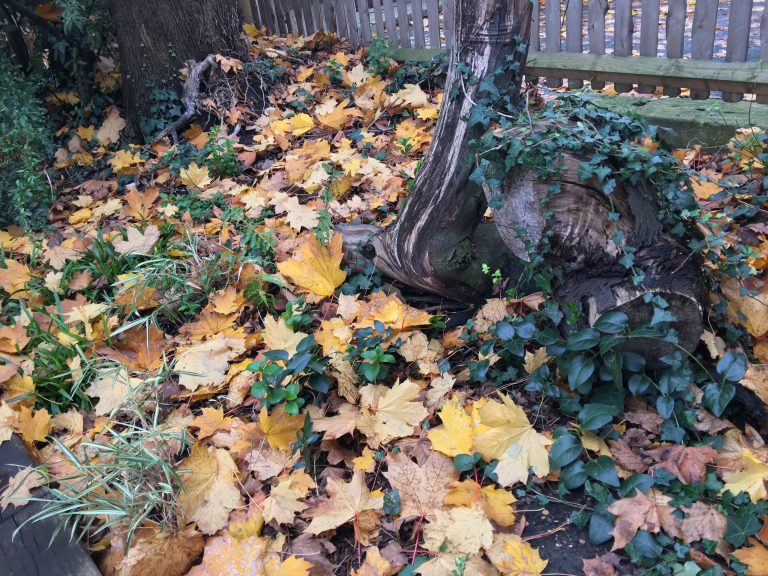
This everyday autumnal scene looks uninteresting and unremarkable…
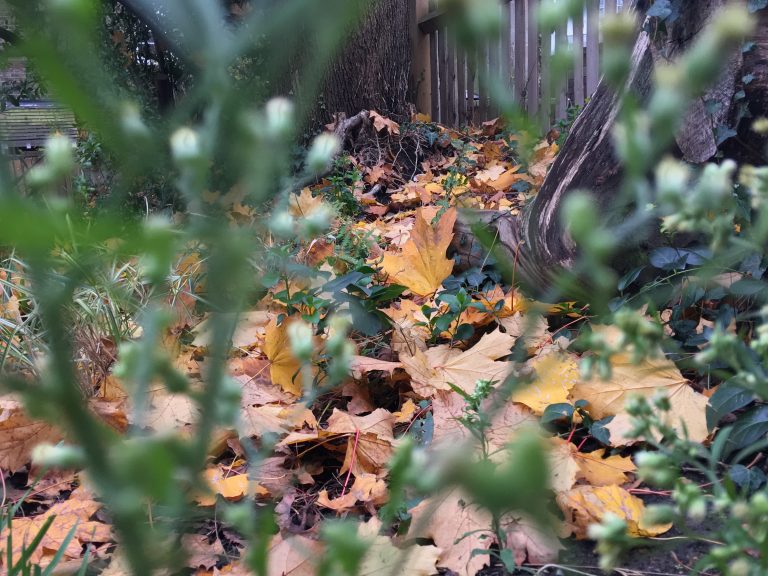
…but is transformed into a far more intriguing shot after experimenting with how it’s framed.
Inventive framing can transform all sorts of everyday scenes, such as a seemingly dreary rain-soaked London street. By concentrating on the reflection of neon signage in a puddle, the intriguing results not only grabs the eye but is also suitably evocative of urban life.

Inventive framing can make otherwise mundane scenes look far more intriguing, such as this shot of a rain-soaked London street.
As you can see, experimenting with composition can dramatically improve your photos.
7. Steady as she goes
Blurry photos, either of fast-moving objects or of subjects in low light, are one of the most common photographic bugbears. With fast-moving objects, use your Camera app’s “burst” mode – typically by holding down the on-screen shutter button. This will take a series of shots in rapid succession.
In low light, your smartphone’s camera will try to keep its lens open for as long as it can to let in as much light as possible for the clearest, sharpest possible shot. The downside is that this increases the chances of blurriness in your photo.
The easiest way to counteract this is to keep your phone as still as humanly possible – hold your phone with both hands, tuck your elbows in and try bracing yourself against immovable objects such as walls, trees and fences.

This shot of The Shard taken in very low light is almost unusable…

…but is transformed into a much sharper, more presentable and atmospheric photo using our tips and guidelines.
Even so, it’s impossible to hold your phone perfectly still. If you can, rest your phone against solid objects such as walls, shelves and rocks. If you can’t reach the screen after doing this, you can usually take a shot by using the earphones included with your phone.
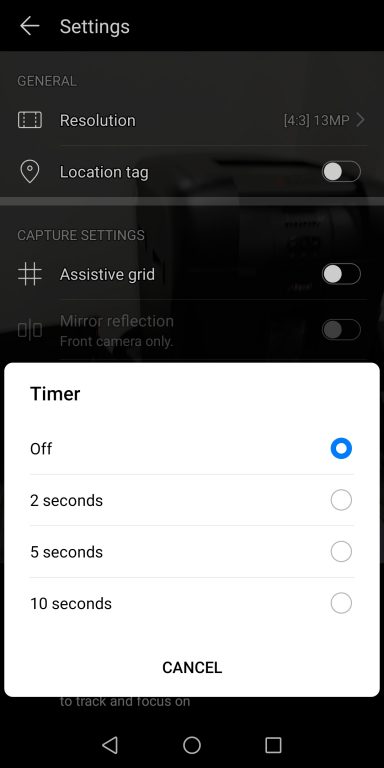
When the Camera app is open, pressing on one of the earphones’ buttons – typically the volume down button – will take a shot. Alternatively, most smartphone camera apps have a built-in timer, so you can set a shot to be taken after a brief time delay.
Propping your phone against a solid object and using the timer in your Camera app can help reduce blurriness, especially in low light.
The best way to counteract blurry low-light shots is to mount your phone on a tripod. That way, your phone will be kept perfectly still while you shoot, either by tapping the screen, by timer or by remote control. You can buy an adapter to mount your phone on standard tripods designed for dedicated cameras.
Or you can buy tripods specifically designed for smartphones – these are often pocket-sized, so you can take them anywhere, while some have specially designed legs that can be wrapped around fencing, thick branches and other steady objects. This not helps keep your phone still and steady despite its small size, it can also help you frame your shots more inventively (as mentioned in tip 6 above).
Even if you own a phone with a specialised night mode for taking low-light shots, such as the Huawei P30 Pro or Google Pixel 3a, these tips still apply. Indeed, they’ll help make your night mode shots look even better.
8. Don’t use your zoom
If your phone only has a single lens, don’t zoom in when taking a shot. As the lens can’t physically magnify what you’re shooting, the Camera app on your phone is using a “digital zoom” – which means it’s cropping your photo instead, often losing detail in the process.
It’s far better to take a snap and then crop later when you’re not rushing to capture a fleeting moment. You’ll not only have more time to consider what to crop, leading to more effective and better-looking results, but you can undo the results if you’re not happy with them.
That’s something you can’t do if you “zoom” while taking the shot.
This guideline is less applicable if your phone has multiple lenses – as many of the new flagship phones do – with an actual zoom lens (known as an optical zoom) among them. This should still be used judiciously though.

Some of the latest smartphones, such as the Samsung Galaxy S20 Ultra 5G, have a zoom lens. But zoom lenses on smartphones should be used carefully to get the best looking results.
With most optical zoom lenses, the more you zoom in the less sensitive the camera will be to light. This makes zoomed-in shots taken in low-light situations more prone to blurriness and loss of detail.
9. Practice, practice, practice
It’s all very well reading about photography in theory, but the best way to hone your shots is to go out and apply these tips to real life shots using your own smartphone. Practice makes perfect – a hoary old aphorism, but true.
10. Editing
Don’t be afraid to edit your photos. It’s not cheating, it’s not hard to do and you can make noticeable improvements – especially if you go beyond the filters supplied in apps such as Instagram.

This impromptu photo of seagulls in front of Tower Bridge isn’t bad…

…but it looks even better when cropped and adjustments are made to the shadows and colour balance.
You don’t necessarily have to invest in extra apps either. The editing options built into the photos/gallery apps supplied with many phones can be surprisingly effective. Along with cropping, try experimenting with options for adjusting the contrast, shadows and highlights of your photo.
The results can be subtly but noticeably better. Happy snapping.


